Continuous Integration with Jenkins Pipeline - Part 1
In this post, I will discuss on continuous integration with Jenkins using pipeline. Jenkins will be setup in AWS as master-slave topology. Jenkins master will only hold the configuration while Jenkins slave will perform the build process. With pipeline scripts you can work more faster than freestyle projects in Jenkins. Of course, I am not introducing what is Jenkins and what it can do.
What is Jenkins Pipeline?
Jenkins pipeline is a suite of plugins which allows Jenkins to perform continuous integration, deployment and delivery process as code. Domain specific language (DSL) groovy is used to write Jenkins pipeline scripts. Rather than selecting multiple options, check boxes in freestyle projects you can just write pipeline script and keep it as a file named ‘Jenkinsfile’ in the SCM which will be enough to accomplish your task. Jenkins pipeline consists of multiple stages which are subtasks and multiple stages form a node. A node can be labelled which is useful for run Jenkins labelled job.
What We Need?
We need three servers with SSH user with root privileges. Among three servers one will be Jenkins master, second one will be Jenkins slave and the last server will be application server where application will be running. We also need application source code hosted in GitHub, GitLab, BitBucket or any source control repository. I will be using Linux server with Ubuntu 16.04.3 version and GitHub as the source code repository.
Setup Jenkins in Jenkins Master
At first we need to install Java to run Jenkins. To install java login to jenkins master and run the following commands.
1
2
3
4
ubuntu@jenkins-master:~$ sudo add-apt-repository ppa:webupd8team/java -y
ubuntu@jenkins-master:~$ sudo apt update
ubuntu@jenkins-master:~$ sudo apt install oracle-java8-installer -y
ubuntu@jenkins-master:~$ sudo update-alternatives --config java	#take the java path from here
Then collect the java path from here which is the absolute path to java. Then we need to export this path as JAVA_HOME environemtn variable using the following command:
1
ubuntu@jenkins-master:$ export JAVA_HOME=/usr/lib/jvm/java-8-oracle/jre
Now setup Jenkins using the following commands
1
2
3
4
5
ubuntu@jenkins-master:~$ wget -q -O - http://pkg.jenkins-ci.org/debian-stable/jenkins-ci.org.key | sudo apt-key add -
ubuntu@jenkins-master:~$ sudo sh -c 'echo deb http://pkg.jenkins-ci.org/debian-stable binary/ > /etc/apt/sources.list.d/jenkins.list'
ubuntu@jenkins-master:~$ sudo apt-get install python-software-properties -y
ubuntu@jenkins-master:~$ sudo apt-get update
ubuntu@jenkins-master:~$ sudo apt-get install jenkins -y
After running the above commands Jenkins should have installed. You can browse to http://your_server_ip:8080 to make sure that Jenkins is running. If not then make sure 8080 port is open in firewall rule. At first, Jenkins will ask you to provide secret.
 Provide Jenkins Secret
Install suggested plugin and set username/password for successful installation. Set up the suggested plugins in Jenkins. Another thing to mention that Jenkins application creates a user named jenkins with home directory in /var/lib/jenkins. All Jenkins jobs and tasks run on behalf of this user. So this user will play a vital part in Jenkins master-slave architecture.
Next, generate ssh key of jenkins user. We need SSH key in order to connect Jenkins Slave with Jenkins Master. Following commands will generate and enure that jenkins user SSH key is created.
1
2
3
4
ubuntu@jenkins-master:~$ sudo su - jenkins
jenkins@jenkins-master:~$ ssh-keygen -t rsa -b 4096
jenkins@jenkins-master:~$ ls -l ~/.ssh/
jenkins@jenkins-master:~$ exit
Next, change SSH host key checking option in SSH configuration in Jenkins Master server. If we don’t change this option then SSH operation from this server will encounter SSH known host key checking which will disallow automated SSH login from Jenkins master to Jenkins slave.
1
2
3
4
ubuntu@jenkins-master:~$ sudo vim /etc/ssh/ssh_config #edit the config file

StrictHostKeyChecking no		                      #option already in the file
UserKnownHostsFile=/dev/null 	                    #add this line below the previous line
After editing the file save and quit using vim. In the next part we will discuss on connection between Jenkins slave-master and credentials management in Jenkins.
Install Jenkins NodeJs Plugin
After installing Jekins we need to install NodeJs plugin because later we need to use yarn to build our target application. After installing plugin we need to spcecify nodejs version and yarn version to use in Jenkins. Go to Jenkins Dashboard > Manage Jenkins > Manage Plugins > Available (in picture I am in the installed tab)
NodeJs Plugin Setup
After installing the plugin we need to configure nodejs, yarn version. Go to Jenkins Dashboard > Manage Jenkins > Global Tool Configuration and perform nodejs installation as following,
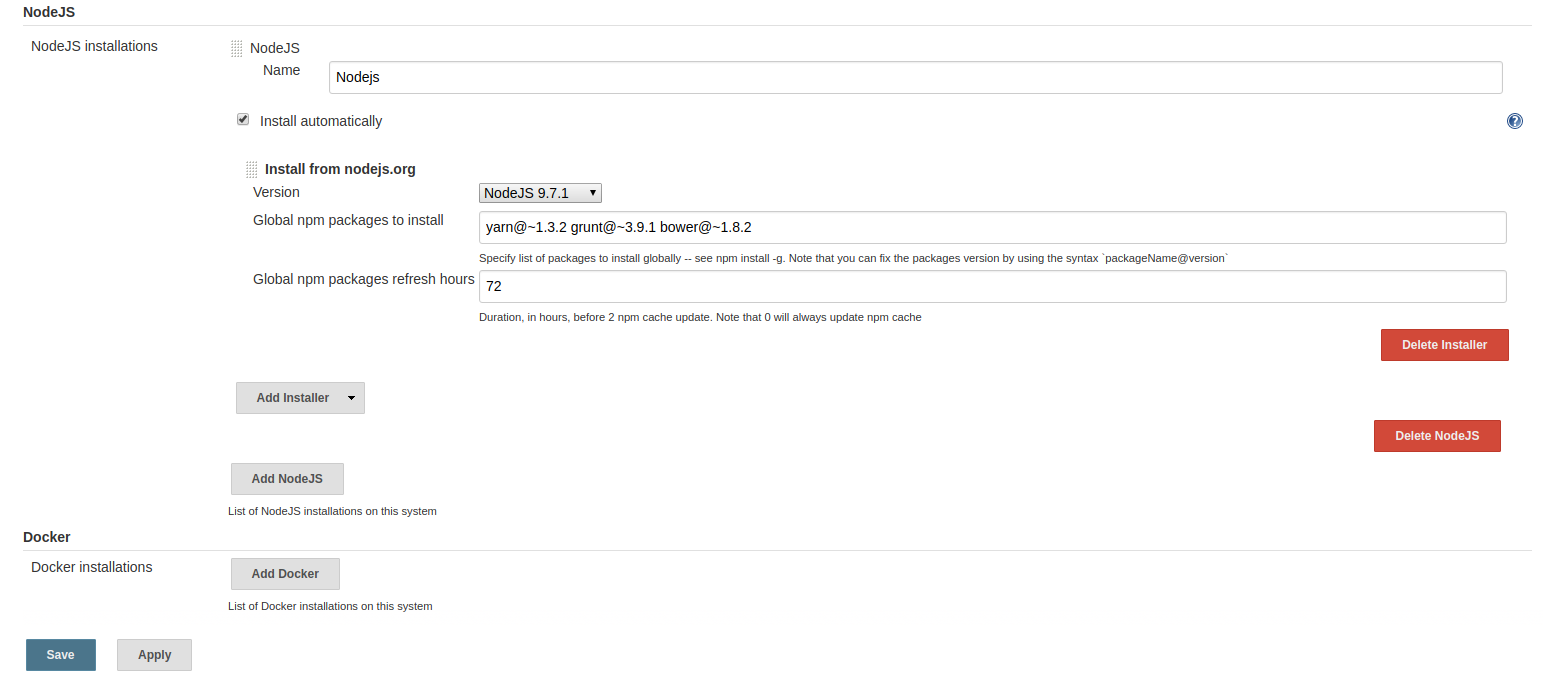 NodeJs and Yarn Installation
In the next post I will discuss on communication between Jenkins Master and Slave server.
Comments